
GENRE: Point & Click Adventure
WHERE TO GET IT: GOG
============================================================
PART 2
ISTANBUL
============================================================
~~~~~~~~~~~~~~~~~~~~~~~~~~~~~~~~~~~~~~
PASHA PALACE HOTEL
~~~~~~~~~~~~~~~~~~~~~~~~~~~~~~~~~~~~~~
HOTEL ROOM
Watch the cut scene, as the Waiter
brings you Room Service. You
automatically leave the room.
LOBBY
Talk to the Receptionist behind the
counter on the right and work through all the conversation topics. Look at the computer at the end of the
counter. Look at the photo on the
counter, next to the computer. Look at
the map on the wall, to the right of the Reception Counter. Talk to Anna Maria and work through all the
conversation topics. Walk down a few
steps, and head down the stairs, into the Dining Area.
DINING AREA
Look at the middle table on the right,
and take the PASHA PALACE KNIFE.
Talk to the Waiter and work through the conversation topics. Leave the Dining Area, and go back to the
Lobby.
LOBBY
Look at the Map on the wall next to the
Reception Desk again. You and Anna
Maria discuss how to get into the Topkapi Palace (this won‘t happen, unless
you‘ve spoken to the Waiter). Look at
all the sections of the Palace:
- Harem
- Museum
- Lover’s Vestibule
- Fountain Courtyard
- Courtyard
- Entrance
Step away from the Map.
Walk down & right, and return to the
Dining Area.
DINING AREA
Talk to the Waiter again and work
through the conversation topics. Leave
the Dining Area.
LOBBY
Talk to the Receptionist and work
through the conversation topics. Walk
right, climb up the stairs, and head through the door to leave the hotel.
MAP
Go to Topkapi Palace.
~~~~~~~~~~~~~~~~~~~~~~~~~~~~~~~~~~~~~~
TOPKAPI PALACE
~~~~~~~~~~~~~~~~~~~~~~~~~~~~~~~~~~~~~~
PALACE ENTRANCE
Talk to the Guard - you convince him
that you’re a journalist called Eamon O’Mara.
Sadly, the Guard still won’t let you in without any I.D. Without I.D., there’s nothing you can do
here. Walk down to the Map.
MAP
Go back to the Pasha Palace Hotel.
~~~~~~~~~~~~~~~~~~~~~~~~~~~~~~~~~~~~~~
PASHA PALACE HOTEL
~~~~~~~~~~~~~~~~~~~~~~~~~~~~~~~~~~~~~~
LOBBY
Walk left to the Reception Desk. Talk to the Receptionist and ask about the
following topic.
- Eamon O’Mara
She mentions an important LETTER that
she had to sign for, for Eamon. Talk to
Anna Maria and ask her about Eamon O’Mara.
Look at the LETTER on the left side of the Reception
Counter. Try to take the LETTER,
but the Receptionist stops you. From
your Inventory, use ANNA MARIA’S ICON with the LETTER on the left
edge of the Reception Counter. She
agrees to grab the LETTER for you, while you distract the
Receptionist. Now talk to the
Receptionist, and ask about the following topic.
- Golf
Watch the cut scene, as you display your
golfing skills, and Anna Maria steals the LETTER from the counter. Now talk to Anna Maria and ask about Eamon
O’Mara. She gives you the MAP AND ID
CARD that was in the LETTER.
In your Inventory, look at the MAP AND ID CARD. You separate them, so you have a MAP and
EAMON’S ID CARD. Look at EAMON’S
ID CARD in your Inventory, to see that Eamon’s photo is loosely attached to
the card. You’ll need to do something
about that. In your Inventory, use PASHA
PALACE KNIFE with your BAIL BOND ID to get PHOTO OF GEORGE. Now in your Inventory, combine PHOTO OF
GEORGE with EAMON’S ID CARD to create your very own ID FOR
TOPKAPI, as well as EAMON‘S PHOTO.
Walk right, climb up the stairs, and go through the door to leave the
hotel.
MAP
Go to Topkapi Palace Hotel.
~~~~~~~~~~~~~~~~~~~~~~~~~~~~~~~~~~~~~~
TOPKAPI PALACE
~~~~~~~~~~~~~~~~~~~~~~~~~~~~~~~~~~~~~~
PALACE ENTRANCE
Talk to the Guard and work through the
conversation topics. You fool him into
believing that you really are Eamon O’Mara.
Head up through the arch, and onto the gate.
Try to walk through the gate, but the
Guard stops you. Don’t show your
doctored ID FOR TOPKAPI to the Guard, because he’ll know you’re not
really Eamon, and he’ll shoot you dead.
Try to talk to the patrolling Guard, who will tell you to proceed to the
gate. Now talk to Anna Maria, and ask
about the patrolling guard (this option won’t appear, unless you have spoken
with the patrolling Guard). When Anna
Maria is busy with the patrolling Guard, walk left, through the arch, and along
the path.
COURTYARD
Walk over to the scaffolding on the
right. Look at the door in the wall,
next to the scaffolding. Try to open the
door, but it’s locked. There are 2
sections to the scaffolding - climb up onto the scaffolding on the right, and
climb up to the top. Wait until the
Guard is walking left, then take GUARD’S PHONE from on top of the wall,
above the lantern. It’s hard to spot,
but it’s there.

Look at the GUARD’S PHONE in your
Inventory to learn the Guard’s mobile phone number - 555 654897. Now again, wait until the Guard is walking
left, then replace the GUARD’S PHONE back on the wall. Climb down the scaffolding.
Walk over to the section of scaffolding
on the left, and climb up the scaffolding to the top. Look at your PDA in your Inventory,
and select the following options.
- Phone
- Guard
Wait until the Guard goes to answer his
phone, then climb over the wall.
HAREM
Wait until the Guard has his back to
you, and is walking away from you.
Follow him up to the back wall, but make sure he doesn’t see you. When the Guard turns left, climb up into the
arch in the back wall. Walk forward a
few steps, to the other end of the arch.
Watch the cut scene to see the Guard drinking from his cup. Look at the arched window on the right, and
try to use the arch window on the right - the plaster in the wall is loose, and
you can see rubble underneath. Use PASHA
PALACE KNIFE with the window. Some
loose plaster falls to the ground. The
Guard hears the noise, and goes to check it out. While the Guard is busy, quickly follow the
path up & right. Click on the cup on
the window sill to drink the tea, then quickly run back to the 1st
hallway. The Guard will see that he’s
run out of tea, so he leaves to make some more.
Walk up a few steps, then climb down the stairs into the Courtyard.
The guard dog is still here, guarding
the place. Better not get too close to
the dog. Climb back up the stairs.
Follow the paths round, until you reach
this window.

Look at the clothes line that’s tied up on the wall, and click on the clothes line to untie it. In your Inventory, use PASHA PALACE KNIFE with the SALAMI to get SALAMI SLICE. Now tie the SALAMI SLICE to the clothes line to attract the dog’s attention. Follow the path up & right, and work your way round to the stairs. Climb down the stairs, into the Fountain Courtyard.
The dog is distracted by the salami on
the clothes line, so he’s no longer guarding anything. Walk up through the arch, onto the
balcony.
BALCONY
While standing on the balcony, click on
the spot in front of you to see the fountain and the courtyard below. Head right, and climb down the stairs, into
the entranceway.
MUSUEM ENTRANCEWAY
Look at the computer in the corner, and
try to use it - it’s password locked.
Look at the postcard stand on the counter. Look at the till on the counter. Look at the door to the museum, and try to
open it - it’s locked. Look at the red
triangle on the wall next to the museum door to learn about the alarm
system. Look at the glass door to see the
guards patrolling outside. Now, let’s
get down to business. From your Inventory,
select your PDA, and choose the following options.
- Connect
- Topkapi Security Management
This is another one of those puzzles
where you have to deflect the beams of light.
Place the diverters like so, remembering to rotate them as
necessary.

Now you have access to the computer, select the following options.
- Service System
- Set system to Test Mode - Yes
- OK
The doors to the museum are now
unlocked, and the lasers are now in Test Mode for 1 hour, which means that the
lasers will flicker on and off. The
problem is… you can’t see the lasers.
Walk over to the door of the museum, open it, and enter into the
museum.
MUSEUM
Before you do anything else, you need to
find a way to see the lasers. Look at
the box on the wall next to the door to realise that it’s a ventilation
system. Open the ventilation box, then
look inside - there’s a safety grille in front of the vent. Place the HOTEL FLYER WITH SCRIBBLED
NUMBER inside the ventilation box, then use your LIGHTER to set it
alight. The smoke reveals where the
lasers are.
Walk forward a few steps, until you see
3 red lasers on the wall. Wait until
they’re off, then walk forward a few more steps, to the next set of
lasers. Wait until they’re off, then
proceed forward. Repeat this until you
reach the far end of the room.
Look at the door in the far wall - Anna
Maria’s waiting on the other side. Talk
to the door and work through the conversation topics with her. Look at the levers on the wall next to the
door - they control the bars on the door, and you need to lower all the bars so
that you can open the door. Pull lever
#1, #2, and #4. The door opens, and Anna
Maria enters the room. Talk to her and
work through the conversation topics.
Look at the door in the opposite wall, next to the statue. Look at the macabre heads on either side of
the door, and try to turn it. Hmm, it
seems like both macabre heads need to be turned at the same time. Talk to Anna Maria again, and she’ll help you
open the door.
FOUNTAIN COURTYARD
Don’t walk forward along the path,
because the guard will see you. Walk up
\ left to the wall, then follow the wall along, making sure you stay behind the
pillars. Walk up to the power switch on
the wall.
Look at the power switch on the wall,
and pull the power switch to turn the fountain pump off. The water in the fountain drains, and you
automatically walk right a few steps.
However, the guard just turns the pump back on again. When the guard sits back down again, walk
back up to the power switch, still keeping behind the pillars. Use your PAPER CLIP with the power
switch to short circuit the switch, then watch as the guard walks away. Quickly walk over to the drained fountain,
and click in the fountain to jump in.
Look at the statue in the centre - if you could move it, that could be
your way down. Try to push the statue,
but you need an extra pair of hands. Use
ANNA MARIA’S ICON from your Inventory on the statue, and Anna Maria will
help you push it. You uncover a hidden
entrance. Climb down through the
entrance, into the catacombs.
CATACOMBS
Walk up a few steps, to the top of the
Walkway, noticing the valves on the wall.
Look carefully at the wall to see a gauge. It’s not very obvious, so you need to look
carefully.

It shows that there is no water flowing through
these pipes. You need to get more water
flowing through the pipes. If you start
at the top, set the valves like so.
1. Valve open.

2. Valve closed.

3. Top
valve - Water rushing in and downwards now.
Bottom valve - Water rushing down the left hand pipe.

4. I can hear the water rushing downwards now.

5. I can hear the water rushing down the left hand pipe.

Head back up to the top of the Walkway,
and notice the water leaking through the pipe on the wall. Walk down a few steps, and look at the gauge
on the wall to see that lots of water is flowing through the pipes now. Walk up again, close the top valve, then open
it again. The water pressure forces a
block to come shooting out from the wall.
Climb through the newly-created hole in the wall.
TUNNEL BEHIND THE CATACOMBS
It’s very dark in here, but follow the
path left a few steps, then up to the edge.
Walk left along the edge a few steps, and climb down the wall.
CITADEL CHAMBER 1
Wow, you found the Citadel! Walk up to the door. Push the button next to the door - nothing
happens. After some trial & error, I
found that the cryptic clues in your MANUSCRIPT PAGE hold the key. Look at the MANUSCRIPT PAGE in your Inventory,
and read the Latin Part 1 passage. Use ANNA
MARIA’S ICON from your Inventory, on the button next to the door. Quickly walk down, and stand on the white
drawing on the ground, that shows the knights who share a horse.

Anna Maria presses the button, and the door slides open. Walk up, through the door.
CITADEL TUNNEL
Follow the dark tunnel, into the next
chamber.
CITADEL CHAMBER 2
Walk left a few steps, and look at the
door - a knight holding a shield. Look
at the MANUSCRIPT PAGE in your Inventory, and read the Latin Part 2
passage. Also, look at the Black Symbols
at the bottom of the MANUSCRIPT PAGE.
Use the door to see the Knights Templar Statue.

This is a riddle that you need to
solve. You have to change the 4 star
symbols at the bottom, to the correct symbols.
Now click on the Roman Numerals at the bottom, like so.
- Click Roman Numeral I, 2 times, to show a
moon
- Click Roman Numeral II, 1 time, to show a
cross
- Click Roman Numeral III, 0 times, to show
a star
- Click Roman Numeral IV, 2 times, to show
a moon

Walk right, to the other side of the
Chamber.
Look at the door - another knight with a
shield. In other words, another riddle
for you to solve. Use the door, to see
the close-up.
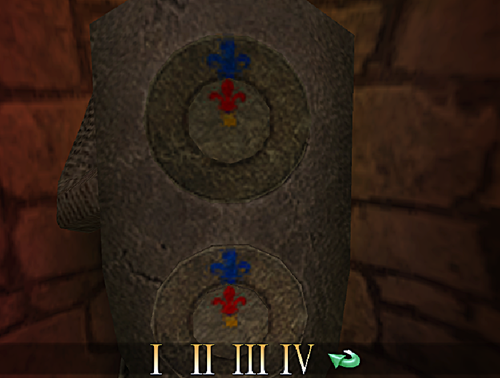
This time, you need to set the Fleur De
Lys icons on the dials correctly. Again,
the answers lie in your MANUSCRIPT PAGE.
Click on the Roman Numerals at the bottom, like so.
- Click Roman Numeral I, 0 times
- Click Roman Numeral II, 2 times
- Click Roman Numeral III, 3 times
- Click Roman Numeral IV, 2 times

Solved!
Walk right, to the next door.
Look at the door - another knight, another riddle. Use the door to see the close-up.

As before, the answer to solving this,
lies in the cryptic clues in your MANUSCRIPT PAGE. You have to turn each tumbler, to display the
correct symbol. Click on the Roman
Numerals at the bottom, like so.
- Click Roman Numeral I, 1 time
- Click Roman Numeral II, 4 times
- Click Roman Numeral III, 2 times
- Click Roman Numeral IV, 3 times

Excellent! Walk right, to the alcove.

Look at the alcove to see that it’s
empty. Use ANNA MARIA’S ICON from your Inventory, with the alcove. After the cut scene, Anna Maria stands in the
alcove, while you stand in another alcove.
The final door slides open. Walk
up through the door, into the Treasure Room.
CITADEL TREASURE ROOM
Watch the cut scene. You and Anna Maria become trapped in this
room. Look at the CHERUB STATUE on
the plinth, but don’t touch it, or you’ll die.
Look at the red Map on the floor, and click on the following
places.
- Paris
- Cyprus
- Constantinople
- Babel
- Alexandria
- Acre
- Rome
Using the MANUSCRIPT PAGE, as
well as checking the Notes in your PDA, you can determine that you need
to interact with the following places, in order.
- Acre
- London
- Paris
- Cyprus

It appears as though nothing has
happened. But you’ve actually
deactivated the trap, so take the CHERUB STATUE from the plinth. You automatically place it down on the
ground. Now look at the plinth, and use
the plinth. Move the plinth, like
so.
- Left
- Left
- Left
- Down
- Left
- Down
- Left
- Down
It worked. The door opens, and you and Anna Maria make
your escape. Watch the lengthy cut
scene.
JAIL CELL 1
After a very eventful night, you wake
up… and are immediately arrested. You
have to escape from here.
Look at the hard, wooden seat. Look at the drain in the middle of the
floor. Look at the damp wall on the
right - the mortar‘s crumbling. Look at
the rat hole in the wall on the left.
Search the rat hole 2 times, to find a BRACKET. There is a small table on the left, at the
front of the cell. Take MOULDY CHEESE
from the table. Use BRACKET with
the damp wall on the right, to scrape away the mortar. Now pull the stone block out of the
wall.
Watch the cut scene with Father Nicolas
and Sister Immaculata. They let slip
that you are to be executed. Yikes! Father Nicolas gives you MECHANICAL MOUSE,
SQUEAKY TOY, and BAG OF MARBLES.
Before leaving, Sister Immaculata asks you to come up to the roof in 1
hour.
Look at the MECHANICAL MOUSE to
get a MOUSE KEY. Open the BAG
OF MARBLES to get MARBLE STRING, PIECE OF CLOTH, and some
loose MARBLES. Use MARBLES with
the drain in the floor, and watch how the roll under the cell door. Climb through the wall on the right, into the
next cell.
JAIL CELL 2
Click on the cell door to get the
guard’s attention. Oh dear! He slipped on the marbles. Climb through the wall on the left, back to
Jail Cell 1.
JAIL CELL 1
Walk forward, to the cell door. Search the unconscious guard to find CELL
KEY. Use the CELL KEY on the door to unlock
it. Now you have to prevent the guard
from raising the alarm, as you plan your escape. Use MARBLE STRING with the guard to
tie him up. Use PIECE OF CLOTH with
the guard to gag him. That’s taken care
of the guard! Walk up a few steps, and
look at the table on the left. Hmmm, you
thought your things would be here. Climb
up the stairs. Go through the door at
the top of the stairs.
GUARD’S ROOM
Uh-oh… there’s a vicious guard dog
here. Better not get too close! Look at the empty dog bowl on the
ground. Look at the CAN OF BEEF on
the table - you can’t pick it up while the dog is watching you. Show SQUEAKY TOY to the dog, and while
he’s busy watching it bounce around the floor, quickly take CAN OF BEEF from
the table. You automatically retrieve
your SQUEAKY TOY. In your
Inventory, use the MOUSE KEY to open the CAN OF BEEF, so you have
OPEN CAN OF BEEF. Now put the OPEN
CAN OF BEEF into the empty dog bowl on the ground. The dog won’t bother you anymore. Walk right, climb up the stairs, and go
through the door.
STAIRS
You find yourself back in a familiar
area. Climb up the stairs, to the
balcony.
BALCONY
Follow the balcony round the corner, so
you can see the vines growing on the wall.

If you could distract the guards below,
then you could climb up the vines to get to the roof, where the nun wanted to
meet with you. You need a plan! Go right, round the corner, and climb down
the stairs.
Head up, through the arch, to find
yourself back in the Museum Entranceway.
MUSUEM ENTRANCEWAY
Look at the computer in the corner - it’s
been upgraded. Try to use it, but you
can’t get past the extra firewall. Walk
left, to the museum door. Look at the
door, to see that it’s locked again. Use
MECHANICAL MOUSE with the door.
Quickly walk right, and up through the arch, to leave the area.
Start climbing up the stairs. It isn’t long before the MECHANICAL MOUSE sets
off the alarm in the museum, causing all the guards to leave their posts to
investigate. This is your chance. Climb up the stairs, and go round the corner,
to the balcony.
BALCONY
There’s no guards in the Fountain
Courtyard below, now. Climb up the vines
you saw on the wall, up to the roof.
ROOF
Avoid that guard! Walk left a few steps, and look at the wall
to see that it has a loose stone. Place
your SQUEAKY TOY on the loose stone.
It will start talking, and the guard will come to investigate. While the guard is distracted, head right,
then up to the next section of the roof.
Explore the area, and find the nun in
the top corner.

Approach the nun, and watch the cut
scene. Wait a minute! That nun!
She’s… she’s… NICO!!!
~~~~~~~~~~~~~~~~~~~~~~~~~~~~~~~~~~~~~~
PASHA PALACE HOTEL (PLAYING AS NICO)
~~~~~~~~~~~~~~~~~~~~~~~~~~~~~~~~~~~~~~
LOBBY
Both of you escape from Topkapi Palace,
and return to the hotel. It’s so good to
see each other again! Since George’s
cover has been blown, you’re playing as Nico now. You suspect that Anna Maria has been playing
George for a fool, but George won’t hear anything of it. You need to find a way up to George’s
room.
Follow the red carpet down the stairs,
and along to the Reception Desk. Look at
the Receptionist, talk to her, and work through all the conversation
topics. She confirms that Eamon O’Mara
is staying here. You trick her into
giving you the key for Eamon’s room - ROOM 505 KEY. Walk left, and climb up the stairs to the 5th
Floor.
~~~~~~~~~~~~~~~~~~~~~~~~~~~~~~~~~~~~~~
PASHA PALACE HOTEL
~~~~~~~~~~~~~~~~~~~~~~~~~~~~~~~~~~~~~~
ROOM 505
You’re playing as George again. Goodness knows how you managed to get up
here, without the Receptionist seeing you!
You need to find a way down to the room that you and Anna Maria stayed
in - Room 304. Talk to Nico and work
through all the conversation topics.
Explore the room if you like, but there’s nothing interesting here. Walk over to the windows, and open the window
on the right. Climb up onto the window,
then click outside the window, to climb onto the window ledge.
5TH FLOOR WINDOW LEDGE
You figure out where Room 304 is. Walk right, along the window ledge, so you
can see the red canopy below you.

Lower yourself, so you’re hanging from
the ledge. Now drop down to the balcony
below.
4TH FLOOR BALCONY
Walk left a few steps - you hear a
scream. Walk right, to the end of the
balcony. Climb over the railing, onto
the ledge. Lower yourself, so you are
hanging from the ledge. Drop down to the
window ledge below.
3RD FLOOR WINDOW LEDGE
Walk left a few steps, but stop when you
see the silhouette in the window. The
silhouette belongs to a policeman, who will raise the alarm if he sees
you. Lower yourself, so you are hanging
from the ledge. Shimmy left, to the end
of the ledge, then climb back up onto the ledge again. You’re outside the window of Room 304. Open the window, then climb into the room.
ROOM 304
Walk forward a few steps, and pick up
the ROSARY from the floor. Walk
up, into the bathroom.
Search the bin to find a CREDIT CARD
RECEIPT. Watch the cut scene. Wow, so ‘Father Nicholas’ is actually a
policeman. He also suspects that Anna
Maria is not quite as innocent as she appeared.
He clears your name, so you’re no longer considered a terrorist. So you can come & go freely, now.
LOBBY
You automatically head back down to the
Lobby. Look at the CREDIT CARD
RECEIPT in your Inventory, to see that it‘s signed by Anna Maria. Maybe you should find out her address, so you
can know what’s really going on with her.
From your Inventory, look at your PDA, and choose the following
options.
- Connect
- Credit R Us
Time for another of those puzzles where
you have to deflect the beams of light.
Place the diverters like so, remembering to rotate them as
necessary.

Click on ‘OK’ 2 times to get Anna
Maria’s address. She lives in Rome! That’s where you and Nico are heading
next.
No comments:
Post a Comment