
GENRE: Point & Click Adventure
WHERE TO GET IT: GOG
===========================================================
PART 3
===========================================================
~~~~~~~~~~~~~~~~~~~~~~~~~~~~~~~~~~~~~~
MONTSERRAT - TRAIN STATION (GEORGE)
~~~~~~~~~~~~~~~~~~~~~~~~~~~~~~~~~~~~~~
COURTYARD
Watch the cut scene, as you, Nico, and
Eva arrive in Montserrat. Look at the
Cathedral on the right - that’s where the Tabula is supposed to be. Notice the 3 guards, guarding the stairs of
the Cathedral. Talk to them - they each
give you a different excuse as to why you can’t enter the Cathedral! There’s no way you can get past these guys,
so you’ll have to find another way into the Cathedral. Head down the stairs at the bottom right.
~~~~~~~~~~~~~~~~~~~~~~~~~~~~~~~~~~~~~~
MONTSERRAT - CABLE CAR STATION (GEORGE)
~~~~~~~~~~~~~~~~~~~~~~~~~~~~~~~~~~~~~~
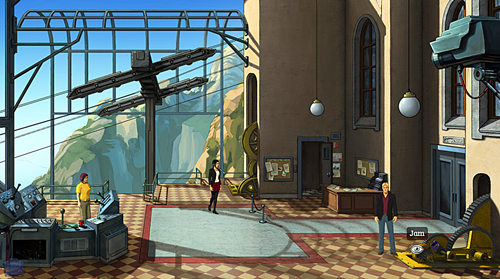
CABLE CAR STATION EXTERIOR
It’s an impressive building. And it looks new. Look at the canopy on the left. Cross over the bridge, and try to enter the
front door, then watch the cut scene with Langham and his goon. Eva decides to follow Langham, since he’s
holding her father captive. It’s up to
you and Nico to find a way into the Monastery.
Walk left a few steps, and use the telescope that‘s looking out over the
mountains.
Drag the telescope view left, until you
see a face in the rocks.

Click on that face. You’ve seen that face before… in the LA MALEDICCIO PAINTING. Langham has the forged version of the painting, which doesn’t show the face, so the face in the rock won’t mean anything to him.
Use the telescope again, and drag the
telescope view left, until you see Santa Cova Chapel.

Click on the Chapel. Drag the telescope view right and down slightly, until you see the other cable car station.

Click on the cable car station. Drag the telescope view right, a little bit
more, until you see the yellow cable car.

There’s something glinting in the cable
car - click on the glint. You recognise
the people in the cable car as your old friends Pearl and Duane Henderson. They seem to be stranded out there. You need to signal them, that you will
help. Use your SIDE MIRROR on the
glint. Pearl must have seen your signal,
because she writes a message on the cable car window, giving you the code to
enter the cable car station. You
automatically step away from the telescope.
Use the door of the building, to enter
the Cable Car Station. Thanks to Pearl
giving you the code, you can easily get inside.
CABLE CAR STATION INTERIOR
Look at the counter near the door on the
right. There’s nobody here. Pick up the LUNCH BOX on the floor
next to the counter. Hmm, the LUNCH
BOX seems to be calling for help.
You need to find a way to break into it, so you can find out what’s
going on. Look at the cogs in the lower
right corner, and place the LUNCH BOX in the cogs.
Look at the cupboard door behind the
counter - there’s someone in there, but she won’t come out until she knows it’s
safe. Look at the Timetable on the wall
next to the cupboard door. Look at the
giant wheels next to the Timetable. Look
at the cable suspension above you.
Walk over to the Control Console on the
left. Try to use the Control Console,
but it’s not powered up. Use the lever
in the Control Console. The cobs in the
lower right corner turn, crushing the LUNCH BOX open. Walk over to the cogs, and pick up the LUNCH
BOX. You find the 2-way RADIO that
was locked in the LUNCH BOX.
Watch the cut scene, as you can now communicate with Duane and Pearl in
the cable car. They want to speak to Kat
- that must be the woman who’s hiding in the cupboard behind the counter. Knock on the cupboard door and talk to Kat,
but she still won’t come out. Use the RADIO
with the cupboard door, and enjoy the cut scene, complete with musical
number!
Now that Kat is no longer hiding, she tells
you how to repair the Control Console.
The problem is… reaching the damaged prongs, which are right at the back
of the console. Walk over to the cogs at
the lower right corner. Use PAPERCLIP
with the jam on the cogs (courtesy of the crushed lunchbox) to get a STICKY
PAPERCLIP.
Walk left a few steps, and look at the
hatch on the front of the Control Console, to get a close-up.
Throw a PIECE OF RICH TEA BISCUIT onto
the prongs.
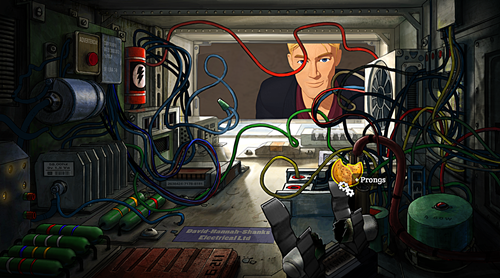
Use your MATCHBOX CONTAINING
COCKROACH with the biscuit at the bottom of the screen. You place the matchbox down, and the
cockroach eats some of the biscuit, before returning to his matchbox. There’s something missing. Use STICKY PAPERCLIP with the
cockroach. Again, throw a PIECE OF
RICH TEA BISCUIT (it’s amazing how well this biscuit has lasted) onto the
prongs. Watch the cut scene, as the
cockroach scutters towards the biscuit, and unknowingly jams the PAPERCLIP in
place, thus repairing the Control Console.
Watch the cut scene, as you and Nico use the other cable car to reach
Santa Cova Chapel.
~~~~~~~~~~~~~~~~~~~~~~~~~~~~~~~~~~~~~~
MONTSERRAT - SANTA COVA CHAPEL (NICO)
~~~~~~~~~~~~~~~~~~~~~~~~~~~~~~~~~~~~~~
CHAPEL EXTERIOR
You’re playing as Nico. Open the Chapel door, and enter the Chapel.
~~~~~~~~~~~~~~~~~~~~~~~~~~~~~~~~~~~~~~
MONTSERRAT - SANTA COVA CHAPEL (GEORGE)
~~~~~~~~~~~~~~~~~~~~~~~~~~~~~~~~~~~~~~
CHAPEL HALL
You’re George again. Watch the cut scene with Duane and
Pearl. Explore the Chapel Hall. Look at the crank handle on the pillar near
you. Look at the stone carving on the
wall. Look at the Wall Of Rock on the
left. Walk left a few steps, and look at
the Black Madonna on the wall. Look at
the recess in the wall next to the Black Madonna. Look at the Altar on the left. Look at the builder’s mug on top of the
Altar. Look at the candelabra hanging
from the ceiling.
Walk right a few steps, and look at the WOOD
SHAVINGS on the floor next to Nico, and pick up some WOOD SHAVINGS. In your Inventory, mix the WOOD SHAVINGS with
the FLOWERS to make POT POURRI, then mix POT POURRI with
the EU DE TOILETTE to get SUPER POT POURRI. Look at the scaffolding on the right. Tap the oil drum to the left of the
scaffolding. Tap the paint tins hanging
on the scaffolding to hear a dull sound.
Take the BOTTLE OF TURPENTINE from the bottom shelf of the
scaffolding. Touch the fire
extinguisher. Touch the industrial
grater above the fire extinguisher.
Touch the traffic cone. Open the
toolbox on the floor, then take the MASON’S HAMMER from the
toolbox.
Talk to Duane and work through all the
conversation topics. Notice that he
whistles a tune every so often. Talk to
Duane again and work through all the conversation topics again. Pearl is also here, but she’s extremely upset
because her holiday is turning out to be a disaster. She needs some cheering up.
Go back to the paint tins hanging on the
scaffolding. Pour the BOTTLE OF
TURPENTINE into one of the paint tins - for easiness, we’ll use the left \
top paint tin. Now use the MASON’S
HAMMER to hit the following objects, in this order.

1. Oil drum
2. Left \ top paint tin
3. Oil drum
4. Fire extinguisher
5. Lower \ right paint tin
6. Oil drum
That’s the tune that Duane was whistling
- Ava Maria. Watch the cut scene, as
Nico takes her turn to bash out the tune.
Walk left a few steps, to the Altar.
Place the SUPER POTPOURRI into the builder’s mug on top of the
Altar. Use your SAFETY MATCHES with
the builder’s mug to light the SUPER POTPOURRI. Turn the crank handle on the pillar, near the
door, to lower the candelabra. Use your SAFETY
MATCHES with the candelabra to light the candles. Place the SIDE MIRROR with the
candelabra. Use YARN on the
candelabra & side mirror, to tie the mirror in place. Turn the crank handle again to raise the
candelabra. The light reflects onto the
Black Madonna. Watch the cut scene with
Pearl - she’s really cheered up now.
Talk to Pearl and work through all the
conversation topics with her. She’s a
mine of information! It’s becoming more
apparent that you need to find the Ouroboros.
Duane gives his radio to Nico, before him and Pearl leave, so you each
have a radio now. Talk to Nico and work
through all the conversation topics.
Walk right a few steps, to where Pearl
and Duane were standing. Take a CANDLE
from the display. Walk left, to the
Altar. Use MASON’S HAMMER with
the Altar to smash a hole in it.
Voila! You found the
Ouroboros. Try to push the Ouroboros,
but nothing happens. Place CANDLE in
the recess in the wall next to the Black Madonna, then use SAFETY MATCHES with
the recess to light the CANDLE.
Look at the recess next to the Black Madonna again. Now push the Ouroborus in the Altar
again. A secret passage is revealed. You and Nico head through the secret
passage.
~~~~~~~~~~~~~~~~~~~~~~~~~~~~~~~~~~~~~~
MONTSERRAT - SANTA COVA CAVE (GEORGE)
~~~~~~~~~~~~~~~~~~~~~~~~~~~~~~~~~~~~~~
CAVE
Watch the cut scene, as you and Nico
become trapped in a very dark cave. The
stone door on the left, seals you in.
Look at the following things in the darkness, on the right.
- Bottomless Pit
- Squidgy Hole
- Hard Thing
- Fuzzy Round Thing
- Unidentified Thing
- Big Thing
- Smooth Stone
- Stone Object
- Tall Thing
- Figment Of The Imagination
- Imaginary Malicious Denizen
- Wall


Now use MASON’S HAMMER with the following things.
- Figment Of The Imagination
- Imaginary Malicious Denizen
Look again at the Stone Object on the
right. Use your last MATCH with
the Stone Object. The Stone Object turns
out to be a lamp full of oil, and now the whole cave is lit up. Watch the cut scene, as you realise that this
is a Gnostic Shrine. Look at Gehnen’s
corpse slumped over the table on the right, to see a close-up.
Look at the corpse. Gehnen knew he was trapped in this cave, so
he had chosen suicide. Look at the
hat. Pick up the PISTOL
Take GEHNEN’S MAP that Gehnen is
leaning on - Gehnen wrote his last testament on this MAP. Hmm, it looks like there might be a secret
message left, hidden in the testament.
Exit the close-up of GEHNEN’S MAP.
Take GEHNEN’S PHOTOGRAPH, lying
next to Gehnen’s hand. There are symbols
on the back of GEHNEN’S PHOTOGRAPH, which Gehnen has translated. Look at each of the symbols. Exit the close-up of GEHNEN’S PHOTOGRAPH.
Take the ARTEFACT on the
desk. This is it - this is TABULA
VERITATIS. It looks so small and
innocent. So what is it’s true
purpose? Exit the close-up of the TABULA
VERITATIS.
Look at the lamp, and use GEHNEN’S
MAP with the lamp - the writing changes, leaving a clue behind. Look at each of the letters on the MAP -
a, b, c, d, e. Exit the close-up of the MAP.
Look at the inscription below the lamp. Look at the filigree frame in the lamp, and insert the MEDALLION into the bottom right part of the filigree frame. It fits snugly into the frame, illuminating the green carved figure on the wall opposite.


- Begin Sun City Travel Five Day East River
- Travel South Six Day Desert Source Four
River
Watch the cut scene, as you transfer the
decoded directions onto GEHNEN’S MAP, and show your findings to
Nico. Nico, in turn, shows you a Secret
Button in the wall that she found.
Unfortunately, it doesn’t seem to do anything. There must be something that you’re
overlooking, so you explore the cave some more.
Look at the blue carved figure in the
wall. Look at the pillar on the
wall. Look at the plinth \ statue on the
platform - this must be Mary Magdalene.
Interact with the statue 3 times, so you turn it round 3 times, so it’s
facing left. Push the Secret Button in
the wall again - this time, you hear a rumble.
Look at the table again. Look at the canteen on the right of the
table. Look at the torch on the right of
the table. Look at the lamp on the table
again. Remove the MEDALLION from
the bottom right part of the filigree frame, and place it into the top right
part of the filigree frame.

Exit the close-up of the table. The blue carved figure on the wall opposite
is now illuminated. Interact with Mary’s
statue 2 times, so it is facing right.
Push the Secret Button in the wall - you hear another rumble.
Again, look at the lamp on the
table. Remove the MEDALLION from
the top right part of the filigree frame, and place it into the left part of
the filigree frame.

Exit the close-up of the table. The light is now shining on the carved relief
at the bottom of the wall. Look at the
carved relief. Interact with Mary’s
statue 3 times, so it is facing forward.
Push the Secret Button in the wall, one last time. Success!
The door slides open!
Look at the lamp on the table
again. Retrieve the MEDALLION from
the filigree frame, then exit the close-up of the table. Head through the Exit on the left, so you‘re
back in the Chapel.
~~~~~~~~~~~~~~~~~~~~~~~~~~~~~~~~~~~~~~
MONTSERRAT - SANTA COVA CHAPEL (GEORGE)
~~~~~~~~~~~~~~~~~~~~~~~~~~~~~~~~~~~~~~
CHAPEL HALL
Watch the cut scene. Langham and his goon is holding Marques and
Eva at gunpoint. Luckily, they haven’t
spotted you yet. Use REVOLVER with
Langham. Watch the cut scene, as Langham
calls your bluff, and takes the REVOLVER from you. When prompted, choose the following
options.
- Lies
- Truth
Even if you choose different options,
the outcome will be the same - Langham shoots Marques, then kidnaps Eva. Poor Marques dies, while telling you about
Eden. You HAVE to get out of here, and
find your way to Eden, so you can stop Langham and rescue Eva. You can’t go out the front door, because
Langham’s goon is still there. Walk
right a few steps, and head out onto the balcony.
BALCONY
Climb onto the drainpipe, then climb
down. Look at the drain at the bottom of
the drainpipe. Use your RADIO with
the drain, to communicate with Nico and tell her your plan. When the goon is outside the door at the
bottom of the stairs, throw MASON’S HAMMER at him to knock him out. Climb back onto the balcony, then go through
the door, into the Chapel hall.
CHAPEL HALL
Click on Nico, then watch the cut scene
as you both make your escape.
~~~~~~~~~~~~~~~~~~~~~~~~~~~~~~~~~~~~~~
MONTSERRAT - CABLE CAR (GEORGE)
~~~~~~~~~~~~~~~~~~~~~~~~~~~~~~~~~~~~~~
CABLE CAR EXTERIOR
You and Nico are hanging onto the side
of a cable car, after having escaped from the Chapel. Look at the window of the cable car - the
catch is on the inside, so you can’t open it.
Edge over to the door - you can’t quite reach the handle. Use your YARN with the door, to pull
it open. Now interact with the door to
swing across and climb into the cable car.
CABLE CAR INTERIOR
Well, you’re safe inside the cable car
now, but what about Nico? She’s still
outside. And she’s banging on the
window! Try to use the window catch,
below Nico, to open the window… but it’s stuck.
Suddenly, someone starts shooting at you. Watch the cut scene, as Medovsky catches up
with you, wanting his painting.
~~~~~~~~~~~~~~~~~~~~~~~~~~~~~~~~~~~~~~
MONTSERRAT - CABLE CAR (NICO)
~~~~~~~~~~~~~~~~~~~~~~~~~~~~~~~~~~~~~~
CABLE CAR EXTERIOR
You’re playing as Nico again, and you’re
hanging on for dear life, after Medovsky shot at the cable car. Talk to Shears in the cable car on the right,
and work through all the conversation topics.
He has an epiphany, and decides that he wants to be a good guy. So he shoots Medovsky, and helps you and
George. Watch several cut scenes,
including George’s bizarre dream.
Eventually, you arrive at the Garden Of Eden.
~~~~~~~~~~~~~~~~~~~~~~~~~~~~~~~~~~~~~~
DESERT - GARDEN OF EDEN (GEORGE)
~~~~~~~~~~~~~~~~~~~~~~~~~~~~~~~~~~~~~~
EDEN APPROACH
You finally arrive in Eden. This is where Langham was heading, and this
is where you must stop him from raising Lucifer. Walk left, towards the goat. Oh dear, your fear of goats strikes
again. Nico, on the other hand, is quite
taken with the goat. Try to pet the
goat. Nope… you just can’t bring
yourself to do it. Look at the fig tree
near the goat, and note that one branch is full of nice, juicy FIGS…
just out of the goat’s reach. Take HANDFUL
OF FIGS from the branch above the goat.
Give some FIGS to the goat, if you like.
Continue left, past the giant stone
head, until you see Langham’s thugs… but no Langham! Watch the cut scene. You need some kind of a distraction, if you
want to get past those thugs.
Look at the giant stone head. Walk back right a few steps, then continue up
the path, towards the truck. Look at the
back of truck, and take the KNAPSACK from the back of truck. Try to open the driver’s door of the truck,
but it’s locked.
Walk down a few steps, then take the
path on the left, back to where Shears is.
Give KNAPSACK to Shears - you get a close-up of the KNAPSACK. Take DYNAMITE STICKS, TNT, DUCT
TAPE, FUSE WIRE, DYNAMITE (which turns out to be a SAUSAGE),
and PETROL LIGHTER from the KNAPSACK. Exit the close-up of the KNAPSACK.
Walk right a few steps, and return to
the goat. In your Inventory, combine FUSE
WIRE with the DYNAMITE to get PRIMED DYNAMITE. Also, in your Inventory, combine FUSE WIRE
with SAUSAGE to get PRIMED SAUSAGE. Attach PRIMED SAUSAGE to the
goat, then use LIGHTER with the
goat. Now you just have to lure the goat
closer to the goons - from a distance, they will think that the sausage is
actually dynamite.
Walk left, along the path, past the
stone head, back to where Shears is.
Throw HANDFUL OF FIGS at Langham’s Henchmen on the left. Throw HANDFUL OF FIGS at bottom of
path.


Watch the cut scene. Your little ploy worked - the thugs think
that dynamite is tied to the goat, so they flee for their lives. Try to go through the dark hole in the wall,
in between the giant Shedu statues, but it‘s too dark to see anything in that
cave. Use your LIGHTER with the
dark hole in the wall. Watch the cut
scene, as Nico takes the explosives from you.
Again, use LIGHTER with the dark hole in the wall. You and Nico enter the cave, but Shears is
too afraid, so he remains outside.
CAVE
Watch the cut scene. You MUST stop Langham, before it’s too
late. Look at the dead bush next to
Nico.

Use your LIGHTER with the dead
bush to set it alight. Use EAU DE
TOILETTE with the dead bush to enhance the flames. Look at the collapsed bridge leading into the
river. Use the ladder above the
collapsed bridge, to cross over the gap in the rocks, and reach Langham. Work through all the conversation topics with
Langham. Watch the cut scene, as Langham
pushes you into the river.
~~~~~~~~~~~~~~~~~~~~~~~~~~~~~~~~~~~~~~
DESERT - GARDEN OF EDEN (NICO)
~~~~~~~~~~~~~~~~~~~~~~~~~~~~~~~~~~~~~~
CAVE
It’s all up to you now, Nico. You MUST save George, and stop Langham from
raising Lucifer! Look at the dead
bush. Use the ladder to cross over the
gap in the rocks. Use PRIMED DYNAMITE
with the large crack in the back wall.

Now sit back, and enjoy the final
intense cut scenes. You did it
Nico! Langham is dead, and the world is
safe once more!
The End!
No comments:
Post a Comment