
YEAR: 2014
GENRE: Point & Click Adventure
WHERE TO GET IT: GOG
============================================================
VELLA TARTINE - PART 2
~~~~~~~~~~~~~~~~~~~~~~~~~~~~~~~~~~~~~~
SHELLMOUND
~~~~~~~~~~~~~~~~~~~~~~~~~~~~~~~~~~~~~~
THE MEETING
Watch the cut
scene. Shay emerges from his ship, having crash-landed on Shellmound
Beach. Vella wakes up on Shellmound Beach, after trying to fight Mog
Chothra. Who could have known that Shay’s ship IS Mog Chothra.
Vella tries to punch Shay, misses, and ends up in his ship. At the same
time, Shay ends up on Shellmound Beach, outside of his ship for the first time
in his life!
You can continue as
Shay or Vella. But you’ll need some important information from Shay’s
side, in order to complete a puzzle in Vella’s journey, and vice versa.
You can switch between the 2 characters at any time.
This is Vella’s
journey.
CRASH SITE
Click on Vella to
continue her journey.
~~~~~~~~~~~~~~~~~~~~~~~~~~~~~~~~~~~~~~
SPACESHIP
~~~~~~~~~~~~~~~~~~~~~~~~~~~~~~~~~~~~~~
OUTER HULL
You’re trapped
inside Shay’s spaceship, otherwise known as Mog Chothra, unsure about what is
going on. Click anywhere to stand up. A talking KNIFE tries
to stab you. Talk to the KNIFE and work through all the
dialogue. Eventually, you take the KNIFE. When
conversation is over, look at the hole in space. Weird! Walk right
to the next screen.
The ship’s computer
announces that it is trying to repair itself. Look at the 2 broken pieces
of vent on the ground. You can’t do anything about it at the
moment. Your only way out of this area, is that hatch at the top
right. Use KNIFE with the hose hanging down on the
right, to cut a piece of HOSE off. Climb up the hose,
and try to cut another piece. You’re too high up now, and if you cut the
hose up here, you would fall to your death. If only you had a platform to
stand on, you could cut the hose then.
Search in the hole
in the background.

You pull a HELMET from
the hole. The ship’s computer is now able to repair the wall.
Notice that steam is now coming from the pipes in the broken vent. Look
at broken vent on the right. Use your piece of HOSE on
the vent, and attach it to the middle and the bottoms parts, like this.

You’ll get a
message about ‘Accessing Maintenance Panel 36’. A platform jets
out from the wall, right next to the hose. Exit the close-up, and climb
up the hose on the right. From your vantage point, use KNIFE on
the HOSE to cut another piece off, so you now have a
LONG HOSE. You fall, landing on the platform, then sliding down to
the ground.
Now, using
your LONG HOSE, you can reconnect the 2 parts of the broken
vent. Look at the broken vent on the left, and connect the LONG
HOSE to the bottom, like this.
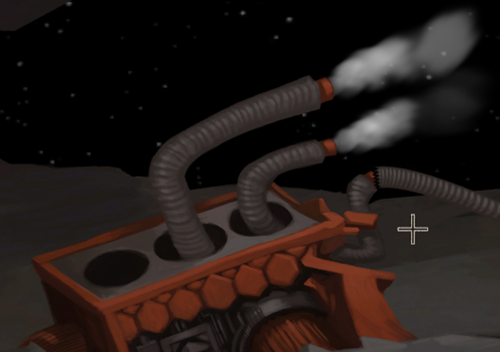
Exit the close up. Now look at the broken vent on the right, and connect the hose to the top part. If you did it correctly, air transport system integrity is restored, and anti-gravity is restored. You float up towards the hatch, but you can’t quite get inside yet. Not to worry. Notice that Shay’s Grabbing Gary Arm is on the left - maybe he could help you. Use the HELMET with the Grabbing Gary Arm, but time it so that you and the claw part of Grabbing Gary Arm are facing each other. It’s tricky to get the timing right, so it will probably take several attempts. Finally, you catch the GRABBING GARY ARM. Now look at Shay’s boot that’s floating around on the right. Use GRABBING GARY ARM to catch the boot on the right. You have to time it so that you’re facing towards the boot, and the giant metal hand is clenched. Eventually, you’ll get GRABBING GARY ARM WITH BOOT. Use GRABBING GARY ARM WITH BOOT with the giant metal hand when it is unclenched, to attach yourself to it. Now simply click on the hatch below you to enter.
AIRLOCK CORRIDOR
You’re inside the
spaceship now. Follow the corridor round, into the Missions
Corridor.
MISSIONS CORRIDORS
This corridor
contains the rooms where Shay endured his fake missions. But since the
ship crashed, there is some damage to the ship, and the lights seem to be
out. A little Hexipal is waving a torch, to provide some light. Try
entering the 2 doors in the back wall if you like, but they are both
inaccessible. Look at the rubbish chute between the 2 doors, and take
note that it jettisons it’s contents - that will prove useful later on.
Walk left to the next corridor.
Explore the area,
and follow the corridor along. When you reach the barrier, simply push it
out of the way. Go through door at the left end of the corridor.
CENTRAL HUB
This is the Central
Hub of the ship. Climb up the stairs to the raised platform, and try to
interact with the Control Panel. Who do they think they’re fooling with
this baby stuff (hee hee)? Climb down the stairs again. Head
through door on the left.
RECREATIONAL
CORRIDOR
Walk left a few
steps, and look at the door with the window in it. Click on the door -
this is the Control Room, and Shay‘s mum has locked herself in this room.
Choose any dialogue options to talk to her. No matter what you say, you
can’t convince her to open the door. When conversation is over, walk
through the door on the left, into Shay’s Bedroom.
SHAY’S BEDROOM
Explore the
room. Climb through the opened vent, into Marek’s Secret HQ.
MAREK’S SECRET HQ
Marek is here,
still trapped under the debris. Work through all the dialogue with
him. He unlocks the door on the left. Go through the door on the
left, into his bedroom.
MAREK’S BEDROOM
Explore the room,
then crawl through the opened vent on the left.
HALL OF HEROES \
JUNK ROOM
Explore the room
carefully - there’s lots of information about Shay in here. Now, if you
could use the information in this room to convince Shay’s mum, that you are in
fact Shay, she might open the door to the Control Room.
Look at the Medical
Report on the floor at learn that at age 6, he grew 2 inches taller, and gained
3 shoe sizes.
Look at the golden
trophy in the bottom shelf, next to the Medical Report, to learn that Shay had
purple boots.
Look at the photo
of Shay & the snake, on the top shelf, to learn that his shoes were size
7.
Look at the gold
space boots on the floor on the left - they have polka dots.
When you’re ready,
use the Teleporter on the left, and teleport to the main Teleporter Room.
TELEPORTER ROOM
Hey, your head is
slightly bigger… and your voice is slightly deeper. Do NOT be tempted to
go back through the Teleporter - you need a deeper voice in order to fool
Shay’s mum into thinking that you are him. But you’re not quite there
yet. Walk left, back to the Central Hub.
CENTRAL HUB
You’re back at the
Central Hub. Your head is still bigger and your voice is still deeper,
but not deep enough yet. There are 2 doors in the right wall, and you
came from the green door. Go through the blue door in the right wall, so
you are in the corridor that contains the Missions Rooms.
MISSIONS CORRIDORS
The Mission Rooms
are still locked. Follow the corridor along, and go through door at the
right end of the corridor.
This is the other
part of the Missions Corridor. The Hexipal is still here, waving her
torch. The blue door in the back wall is another teleporter. Go
through the teleporter, and teleport back to the main Teleporter Room.
TELEPORTER ROOM
Just as you wanted,
your head is even bigger now. Your voice should be deep enough to pass
for Shay now. Walk left to the Central Hub.
CENTRAL HUB
Go through door on
the left, so you are in the Recreational Corridor.
RECREATIONAL
CORRIDOR
Walk left a few
steps, to the door with the window, and the sparking electrical panel.
Talk to the door. Shay’s mum answers, and she wants proof that you are
Shay, so she asks you a few questions. Using the information you found in
the Hall Of Heroes, you should be able to answer her correctly. Use the
following dialogue options.
- It’s me. Shay.
- Mister
- Huggy
- Please, can we not do this?
- Purple.
- Size 4...
- Polka-dot.
Shay’s mum opens
the door, and sees that you are not really Shay. The ship jerks suddenly,
and you both stumble back into the Control Room.
CONTROL ROOM
Shay’s mum is
understandably angry at you for deceiving her, and she demands answers.
Work through all the dialogue with her. Watch the cut scene with Marek
the wolf… who reveals himself to be Marekai, an evil mastermind, who tricked
Shay‘s family into believing they were on a peaceful mission. Now he’s
locked you in this Control Room - you have to find a way out, and put an end to
his evil plans!
Explore the
room. Look at the photo of Shay and his parents, on the Work
Station.

Look at the strange
symbols on the left of the photo, behind Shay’s mum. This hold a vital
clue for a puzzle in Shay’s journey.
Pick up the FORK that’s
perched on the left edge of the Work Station. Talk to Shay’s mum again
and work through all the dialogue. Click on the screen to talk to Marekai
and work through all the dialogue. The Maidens that Mog Chothra kidnapped
are still onboard the ship, but they are locked up. You HAVE to find a
way out of this room! Maybe you could get a little outside help?
Use the Central Control Sphere that’s hanging from the ceiling. Shay’s
mum used this to see various parts of the ship. When you use it, you can
controls things remotely.
CENTRAL CONTROL
SPHERE
Using the Central
Control Sphere, you can see the corridor outside the Control Room. Click
on the Up Arrow on the right, to enter the kitchen.
Click on the
padlock icon on the left, to unlock the kitchen door. There’s nothing
else you can do here, so click on the left arrow to leave the kitchen.
Back in the
corridor, click on the left arrow to enter Shay’s bedroom.
In the bedroom,
click on the grabbing arms icon at the top left. The grabbing arms will
remove the deflated blow-up Shay doll from the bed, and take it away to clean
it up. Click on the right arrow to leave the bedroom.
In the corridor
again, click on the right arrow to see the Central Hub.
In the Central Hub,
notice the padlock on the door underneath the raised platform, indicating that
the door is locked. Click on the padlock to unlock the door. Click
on the right arrow to reach the Missions Corridor.
Click on both padlocks
on the doors in the back wall to unlock them. Click on the right arrow to
get to the other end of the Missions Corridor.
Hexipal is here,
waving her torch. Maybe you could convince her to unlock the Control Room
door for you. She’s programmed to repair things, so you could use that to
your advantage. Click on the padlock on the door in the back wall to
unlock it.
Now all the doors
are unlocked, the next problem, is to fix all the damaged systems. This
puzzle is rather fiddly, and takes some careful timing. Thankfully, you
can keep trying as many times as you like, until you succeed.
Hexipal will walk
across the room, and fix any problems that crop up. You have to lead her
into the next corridor. So start by clicking on the lightning bolt near
her, on the right. Then as she is fixing that, time it right and click on
the other damaged systems, as shown here.

Hexipal will follow
the trail of damaged systems, repairing them as she goes, and hopefully
continue left, into the next corridor. When she’s gone into the left
corridor, you click on the left arrow to follow her into the left
corridor.
Again, you have to
lead Hexipal along the corridor, and left into the next corridor. This
part is trickier than the previous corridor, but you can keep trying as many
times as necessary. Remember to time it right. Click on the damaged
systems like this.

If you timed it
correctly, she’ll go left, into the next corridor. Click on the left arrow to
follow her.
Hexipal is in the
Central Hub now. As before, you have to lead her left, into the next corridor.
Click on the damaged systems, as shown here.

Click on the left
arrow to follow Hexipal to the next corridor.
We’re back outside
the Control Room again. This room is easier, with just one damaged system to
repair. Click on the damaged system, as shown here.

As she walks past
the hull breach, she’ll get sucked outside the ship. Poor little
Hexipal! You have to rescue her, somehow. Click on the Up Arrow to
enter the kitchen.
Hexipal is outside
the window, and she’s hanging on for dear life! Notice that the deflated
blow-up Shay doll is here, sprawled across the fallen table. The grabbing
arms must have left it here after they removed it from the bedroom. Look
at the computer on the back wall, and look at the hexagon button below
it. Press the hexagon button, and keep pressing it, until you see the ‘Taco
Pill Tuesday’ message. A extending arm icon will appear.
Click on the extending arm icon, and the grabbing hand will appear - it grabs
Hexipal and pulls her back inside. Phew, she’s safe! Now click on
the faulty wiring next to the door, like so.

Hexipal will leave
the kitchen. Click on the left arrow to follow her.
You’re back in the
corridor outside the Control Room. Like before, click on the faulty
wiring in the back wall. Luckily, the hull breach is blocked up enough,
so Hexipal will be safe. Hexipal repairs the damaged wiring, then
automatically repairs the sparking control panel next to your door. That
did it! You’re free!
CONTROL ROOM
Watch the cut scene
as you approach the Red Hanger, where the Mog Factory is located. You
need to make a bomb to destroy the Mog Factory. Talk to Shay’s mum and
work through all the dialogue with her. When conversation is over, leave
the Control Room.
RECREATIONAL
CORRIDOR
Walk through the door
on the left, into Shay’s bedroom.
SHAY’S BEDROOM
Crawl through the
open vent, into Marek’s Secret HQ.
MAREK’S SECRET HQ
Watch the cut scene
with Marekai. Uh-oh, Marekai has orders to incinerate you and Shay’s
mum. Maybe you should stay out of his way. Crawl back through the
vent on the right.
SHAY’S BEDROOM
Leave the bedroom
through the door on the right.
RECREATIONAL
CORRIDOR
Enter through the
kitchen door in the back wall.
KITCHEN
Pick up the DEFLATED
BLOW-UP SHAY DOLL from the table. There’s nothing else you can
do here, so leave the kitchen.
RECREATIONAL
CORRIDOR
Go right, through
the door, to the Central Hub.
CENTRAL HUB
Walk right a few
steps. There are 2 doors in the right wall - go through the blue door,
into the Missions Corridor.
MISSIONS CORRIDOR
The rooms that
contain Shay’s fake missions are located here. The doors were locked
before, but hopefully, you unlocked them remotely, while in the Control
Room. Head through the first door, with the ice cream on it.
ICE CREAM AVALANCHE
ROOM
Look at the
avalanche of ice cream, and look at the Yarn Pals at the top of the
avalanche. Look at the whipped cream gun on the right, and use DEFLATED
BLOW-UP SHAY DOLL with the whipped cream gun to get REFLATED
BLOW-UP SHAY DOLL. Now, the fresh ice cream is up at the top, in the
train, along with the knitted pals. Try to climb up the ice cream
avalanche. You fall back down (hee hee). Okay, use your CLOUD
SHOES on yourself to wear them, then simply walk up the ice cream
avalanche. Chat to the Yarn Pals if you like. Use your HELMET with
the ice cream in the train. Your HELMET becomes a bowl,
so you have a BOWL OF ICE CREAM. Now walk back down the ice
cream avalanche. You lose your CLOUD SHOES, but luckily, you
won’t need them again. When you’re ready, leave the room.
MISSIONS CORRIDOR
There’s a barrier
near the ice cream door. Pull that across, to block the corridor.
The reason for this will become clear soon. Now go back through door on
the left.
CENTRAL HUB
There are 2 doors
in the right wall. This time, go through the green door, into the
Teleporter Room.
TELEPORTER ROOM
Use the middle
(Yellow) Teleporter, and teleport to the Fusion Orb Containment Facility.
FUSION ORB
CONTAINMENT FACILITY
Walk left, into the
next room.
After you narrowly
avoid getting crushed by falling ship parts, go through the blue force field,
then walk down into the Fusion Orb Room.
FUSION ORB ROOM
This Fusion Orb
would make a good bomb, that you could use to stop Marekai. Try to pick
up the Fusion Orb - you learn that it’s safe, as long as it’s kept on
ice. Again, try to pick up the Fusion Orb - it’s too hot for you to
handle. Okay, let’s try something else. Use your BOWL OF
ICE CREAM with the Fusion Orb. This will keep the Fusion Orb
cold, so you have a BOWL OF ICE CREAM WITH FUSION ORB. Head
down to leave the Fusion Orb Room.
FUSION ORB
CONTAINMENT FACILITY
You have your bomb
now, but how are you gonna get it off the ship? Walk through the blue
force field, then make your way right to the corridor.
Use the Teleporter
to return to the Teleporter Room.
TELEPORTER ROOM
Go left to the
Central Hub.
CENTRAL HUB
Go through the door
on the left, to the Recreational Corridor.
RECREATIONAL
CORRIDOR
Walk left a few
steps, and enter the Control Room.
CONTROL ROOM
Talk to Shay’s mum
and work through all the dialogue. Use the Central Control Sphere that’s
hanging from the ceiling.
CENTRAL CONTROL
SPHERE
Press the Up Arrow
on the right, to enter the kitchen.
In the kitchen,
look at the computer on the back wall, and look at the hexagon button below
it. Press the hexagon button, and keep pressing it, until you see the ‘Good
Morning’ message. A extending arm icon will appear. Click
on the extending arm icon, and the grabbing hand will appear with a box of
cereal. The cereal is poured into Shay’s breakfast bowl. Or rather,
where Shay’s breakfast bowl SHOULD be. But since the table has been
knocked over, the breakfast bowl has gone. Thus, the cereal falls onto
the floor. A cleaner robot immediately vacuums it up. Again, click
on the extending arm icon. Again, the grabbing hand will appear with a
box of cereal. While the extending arm is lowered, quickly press the
‘Pause’ button, to prevent the extending arm from raising back up. Now
press ‘X’ at the top right, to exit the Central Control Sphere.
CONTROL ROOM
If you haven’t done
so yet, look at the photo of Shay and his parents, on the Work Station.

Look at the strange
symbols on the left of the photo, behind Shay’s mum. This hold a vital
clue for a puzzle in Shay’s journey. Now leave the Control Room.
RECREATIONAL
CORRIDOR
Walk right a few
steps, and enter the kitchen.
KITCHEN
You see the
extending arm with the box of cereal. Grab the box of cereal - some
cereal will spill onto the floor, causing the cleaner robot to clean it up
again. Now follow the cleaner robot out of the room.
RECREATIONAL
CORRIDOR
Notice the cleaner
robot whizzing along. Follow it right, through the door, into the Central
Hub.
CENTRAL HUB
The cleaner robot
through the blue door on the right. Follow it through that door.
MISSIONS CORRIDOR
Notice that the
cleaner robot is slowed down by the barrier you (hopefully) pulled across
earlier. That will give you some valuable seconds to complete your next
task. Now go back through door on the left.
CENTRAL HUB
Go through door on
the left, back to the Recreational Corridor.
RECREATIONAL
CORRIDOR
Enter the
kitchen.
KITCHEN
You want the
cleaner robot to come back again. So grab the box of cereal hanging from
the ceiling to spill some cereal onto the floor. Follow the cleaner robot
out the door.
RECREATIONAL
CORRIDOR
Follow the cleaner
robot right, to the Central Hub.
CENTRAL HUB
As before, the
cleaner robot goes through the blue door in the right wall. Don’t follow
it this time. Instead, go through the green door on the right wall, so
you’re in the Teleporter Room.
TELEPORTER ROOM
Use the blue
(right) Teleport, and teleport along to the right end of the Missions
Corridor.
MISSIONS CORRIDOR
The cleaner robot
should be emptying the cereal you spilled into the rubbish chute. Before
she leaves, quickly toss your BOWL OF ICE CREAM WITH FUSION ORB into
the rubbish chute as well. If you’re not quick enough, and the cleaner
robot has gone, simply go back to the kitchen and pull on the cereal box
again. The cleaner robot throws a CONTAINER OF CEREAL at
you in temper, which you automatically pick up. Now, again, toss BOWL
OF ICE CREAM WITH FUSION ORB into the rubbish chute. You’ve
disposed of the bomb. Now, you and Shay’s mum have to get off this ship
before the ice cream melts, and the Fusion Orb explodes. But don’t forget
about those Maidens you also have to rescue! Go through the large
back-left door.
RUNAWAY TRAIN ROOM
Shay used this room
for his Runaway Train Mission. The Yarn Pals are sitting in the train,
sobbing miserably. Talk to them to learn that they’re upset because the
‘Young Hero’, aka Shay, is missing. Work through all the dialogue with
them. Talk to the Conductor and work through all the dialogue.
Show REFLATED BLOW-UP SHAY DOLL to the Conductor, then watch
the scene with the train. When given the option, choose the following
dialogue option.
- Yeah, let’s do the WAVE!
The tall Yarn Pal
gets his arms caught on an overhanging branch, and so becomes unravelled.
Poor Yarn Pal. At the end of the ride, your Shay doll burst, and you
leave the room with an arm full of YARN, courtesy of the Yarn
Pal.
MISSIONS CORRIDOR
Look at the ‘Banned
For Life’ banner on the door. Why are you banned? You saved MOST of
them (heh heh)! Use the Teleporter in the back wall, to teleport to the
Teleporter Room.
TELEPORTER ROOM
Use the red (left)
Teleporter to teleport to the Hall Of Heroes.
HALL OF HEROES \
JUNK ROOM
Crawl through the
opened vent on the right, and you find yourself in Marekai’s bedroom.
MAREKAI’S BEDROOM
Look at the door in
the back wall, with the window. Pull the loose tile on the wall, next to
yhe door - the window in the door is now clear, and the kidnapped maidens talk
to you. Walk through all the dialogue with them. When conversation
is over, drop your CONTAINER OF CEREAL in front of their
door. One of the Maidens uses her HOOK to try and grab
the cereal, which you snatch. Now look at the exposed wiring in the back
wall, next to the door. This triggers an alarm. Marekai comes to
investigate what set the alarm off. Luckily, you get out of the room in
time, and he doesn’t see you.
HALL OF HEROES \
JUNK ROOM
You can’t get back
into Marekai’s bedroom from here - you’re going to have to find your way to the
other entrance. Use the Teleporter on the left, and teleport to the
Teleporter Room.
TELEPORTER ROOM
Walk left to the
Central Hub.
CENTRAL HUB
Continue left to
the Recreational Corridor.
RECREATIONAL
CORRIDOR
Head left, and go
through door on the left, into Shay’s bedroom.
SHAY’S BEDROOM
Climb through the
opened vent, into Marekai’s Secret HQ.
MAREKAI’S SECRET HQ
Walk left a few
steps, and use the computer in the back wall with the green button. This
locks Marekai in his bedroom, so he can’t catch you. Pick up the STAR
CHART from the floor, near the door on the left. Unfortunately,
Marekai breaks through his bedroom door and returns here, causing you to make a
hasty retreat. Crawl through the opened vent on the right.
SHAY’S BEDROOM
Go through door on
the right.
RECREATIONAL
CORRIDOR
Head through the
door on the right, into the Central Hub.
CENTRAL HUB
Go through the door
under the raised platform to the Navigation Room.
NAVIGATION ROOM
The Space Weaver is
here, still suffering from his mental breakdown. Now you need information
from Shay’s side to complete this part - you need to know which musical notes
Alex plays for Shay on the pitch pipe. The notes are Mid Note, Mid Note,
High Note, Low Note, Mid Note.
Talk to the Space
Weaver if you like, but he’s just babbling nonsense. Try to give him
your YARN, but he doesn’t want it, because it’s a tangled
mess. In your Inventory, use YARN with the FORK to
create SPINDLED YARN, then give SPINDLED YARN to
the Space Weaver. He’s back in business! Give STAR
CHART to the Space Weaver, and he quickly weaves a NavScarf. Now
you got this STAR CHART from Marekai. Marekai was
headed… here! So you’re not really going anywhere. Space Weaver
thought this was a drill, so he played along. However, you want to get to
Shellmound, where Shay is. So you need to alter the Space Weaver’s
destination. As he prepares Warp Drive, quickly climb down the ladder
next to him.
In the lower
section, look at the Navigation Scarf. You need to convert Alex’s musical
notes into the scarf. The notes are Mid, Mid, High, Low, Mid.
Use HOOK with the Navigation Scarf, and add 3 stitches to the
existing pattern, so it looks like this.

The Space Weaver
begins the journey… and then… stops! Apparently, the engines are being
blocked by Shay’s mum. You need to go and sort that out. Go through
the door on the left.
CENTRAL HUB
Go through the door
on the left.
RECREATIONAL CORRIDOR
Walk left a few
steps, and enter the Control Room.
CONTROL ROOM
You enter the
Control Room, ready to challenge Shay’s mum. However, there is a very
good reason why she blocked the engines! Marekai is inspecting the ship‘s
Nav System, and he would detect that the engines are activated. However,
when he goes to inspect the exterior of the ship, you’ll be free to take off,
and he won‘t be able to stop you.
You can’t do any
more, until Shay’s puzzles are completed.
Click here to continue Shay’s journey…
Otherwise, click here for the final part…
No comments:
Post a Comment