
YEAR: 1996
GENRE: Point & Click Adventure
WHERE TO GET IT: GOG
================================================================
REMASTERED
PART 2
================================================================
~~~~~~~~~~~~~~~~~~~~~~~~~~~~~~~~~~~~~~
LONDON - LONDON
UNDERGROUND STATION (NICO)
~~~~~~~~~~~~~~~~~~~~~~~~~~~~~~~~~~~~~~
PLATFORM
After escaping from
the London Museum, you find yourself in an abandoned underground station.
Explore the area. Look at the blue vending machine on the left, and try
to use it. It needs a coin. Look at the coin slot at the top right
of the machine, and you see something protruding from the slot. Probably
a coin. In your Inventory, open your RED BAG to find
a HAIR CLIP. Use your HAIR CLIP with the
coin slot at the top right of the machine, and you push the COIN through
the machine. Now look at the coin reject slot at the bottom of the
machine, and retrieve the COIN from the coin reject
slot. Use the COIN with the coin slot at the top right
of the vending machine. Again, retrieve the COIN from
the coin reject slot, Also, pick up BAR OF CHOCOLATE from
the vending slot at the bottom of the machine.
Look at poster on
the back wall. Look at the green ticket machine on the left - it needs 3
coins. Look at the pile of sleepers on the left. Walk right a few
steps, and look at the red weighing machine. Use COIN with
the weighing machine to get a SMALL CARD. Look at poster on
the back wall. Look at map on the back wall. Look at the
maintenance cupboard below the map. Use DAGGER with the
cupboard to loosen the door, then use SMALL CARD with the
cupboard to lift the latch on the door. There’s nothing but a red button
inside the cupboard - press the red button. A train stops, and you board
it.
~~~~~~~~~~~~~~~~~~~~~~~~~~~~~~~~~~~~~~
CARIBBEAN - ZOMBIE
ISLAND (GEORGE)
~~~~~~~~~~~~~~~~~~~~~~~~~~~~~~~~~~~~~~
TOP OF THE CLIFF
You finally reach
the top of the cliff. Take the upper right path into the jungle.
JUNGLE
Take a REED from
the swamp. Follow the path right, to the next part of the jungle.
Look at the lair
beneath the rock at base of the tree. Investigate the lair to realise…
something is living in there. Use your REED with the
lair, and it’s inhabitant bites the REED, and makes it
shorter. Walk left 2 times, so you’re at the top of the cliff.
TOP OF THE CLIFF
Take the lower
right path into the jungle.
JUNGLE
Walk right, and
continue right, until you see the boar. Look at the boar - it’s not going
to let you past without a fight. In your Inventory, combine the POISONED
DART with the REED to create a weapon, then use this
weapon with the boar. The boar runs away. Head right along the
path, and continue right, until you reach the Rock Needle.
Look at the Rock
Needle. Pull a creeper off the rock, so it falls to the ground. In
your Inventory, combine FISHING NET with the ELECTRONIC
SURVEYOR’S MARKER, then use NET WITH MARKER with the
creeper on the ground. Pick up the resulting CREEPER WITH NET AND
MARKER, and toss it onto the Rock Needle. The MARKER should
be visible for miles. SAVE YOUR GAME HERE. Now from
Rock Needle, use the following directions to get through the jungle.
- Up
- Right (the lair is here)
- Upper left
- Lower left
- Upper right
- Middle right
- Right
If you followed the
directions correctly, you’ll be on top of a pinnacle, overlooking the
area.
PINNACLE
Look at the
initials carved into the rock, and use the initials to see that they are ‘FK’
for Frederick Ketch. Look at the holes in the rock. Place
your THEODOLITE in the holes in the rock. Use the THEODOLITE again,
to look through it. Through the THEODOLITE’S viewfinder,
scroll right, until you see the ELECTRONIC SURVEYOR’S MARKER at
bottom of the view. It’s hard to find, so look at the screenshot.

Click on the marker
at the bottom of the view. Click on the pillar in the middle of the view
- it’s in line with the marker at the bottom. That has to be where Ketch
hid his treasure. Exit the view.
Head right, to climb
back down the pinnacle.
~~~~~~~~~~~~~~~~~~~~~~~~~~~~~~~~~~~~~~
LONDON - THAMES
DOCK (NICO)
~~~~~~~~~~~~~~~~~~~~~~~~~~~~~~~~~~~~~~
DOCKS
SAVE YOUR GAME HERE. You’re
hiding behind a crate on the right, wondering how you’re going to get onto that
ship. When the guard is out of sight, click on the nearby crate to get
closer to the ship. When the guard is out of sight again, click on the
gangplank, then quickly click on the ladder to climb up. Wait for the
guard to go round again, then climb down the ladder. Open the cupboard
door on the left, then climb back up the ladder. The guard will enter the
cupboard to investigate. Quickly climb down the ladder and close the
cupboard door. Grab the mop on the left, and use it to keep the cupboard
door closed, so that the guard is trapped. Look through the porthole on
the right, and watch the cut scene with Professor Oubier and Karzac.
After Karzac has shot Oubier dead, you automatically enter the main
cabin.
MAIN CABIN
Look at Professor
Oubier, then check that he has no pulse. Take the JAGUAR
STONE from Oubier’s hands. When Karzac tries to strangle you,
use your OBSIDIAN DAGGER on him to defend yourself. You
make a dramatic escape with the JAGUAR STONE.
~~~~~~~~~~~~~~~~~~~~~~~~~~~~~~~~~~~~~~
CARIBBEAN - FILM
SET (GEORGE)
~~~~~~~~~~~~~~~~~~~~~~~~~~~~~~~~~~~~~~
FILM SET
Watch the cut scene
as you inadvertently stumble into a film set. Talk to Carlton Hawks, the
director, and work through all the conversation topics. Look at the bush
with white flowers, and note that it’s buzzing. Use the bush again, to
see that it‘s full of hornets.
Walk left a few
steps to the Refreshments Table. Take STALE BUN, PLAIN
PANCAKE, and POT OF MAPLE SYRUP from the table. Talk
to Flash, the camera man. Talk to Bert, the stuntman on the left, and
work through all the conversation topics with him. Talk to Sharon and
work through all the conversation topics with her. Talk to Haiku and work
through all the conversation topics with him.
Carlton Hawks call
for another scene to be shot - watch the cut scene. Bert takes Haiku’s
place on set. In your Inventory, pour POT OF MAPLE SYRUP over
the DRY PANCAKE, then give PANCAKE WITH MAPLE SYRUP to
Bert. He complains about the syrup dribbling down his chin.
Talk to Haiku on
the left and work through all the conversation topics with him. Use the
bush with the white flowers 2 times. Pick up a STALE BUN from
the Refreshments Table and throw it into the bush. Keep doing this, until
the hornets become agitated, and chase Bert with his syrupy chin. Carlton
Hawks loves the scene, tells Flash to film it. Then Carlton moves
everyone to the beach, to film another scene.
BEACH
Talk to Carlton
Hawks and work through all the conversation topics. You offer to be a
stuntman for the film. The only problem, is that the camera is bogged
down. Talk to Flash and work through all the conversation topics.
Look at the truck
carrying the camera - it’s stuck fast in the sand. Look at the portable
camera next to Flash, and try to use it. You don’t know the first thing
about using cameras. Look at Bert and work through all the conversation
topics with him. Talk to Carlton Hawks again and work through all the
conversation topics with him. You convince him that he can use the
portable camera to film at a more dramatic cave, and that you would be the
stuntman to climb up to said cave. He loves the idea, and immediately
gets to work. Watch the cut scene. When you climb up to the cave,
you find a chest, which contains the EAGLE STONE that you’ve
been searching for.
~~~~~~~~~~~~~~~~~~~~~~~~~~~~~~~~~~~~~~
QUARAMONTE - JUNGLE
(NICO)
~~~~~~~~~~~~~~~~~~~~~~~~~~~~~~~~~~~~~~
SHAMAN VILLAGE
Look at the barrel
in the burnt-out hut. Look at the cup in the burnt-out hut. Talk to
Titipoco and work through all the conversation topics. Look at the MAYAN
STONE on the steps of the hut on the left. Try to pick up
the MAYAN STONE, but it’s too hot. Look at the barrel of
water next to the MAYAN STONE, and try to tip it over, but you’re
not strong enough. Talk to Titipoco and ask him about the barrel.
He helps you tip the barrel of water over, thus cooling the MAYAN STONE.
The STONE has fallen onto the ground near the steps.
Look at the ground covered in ashes, and pick up the MAYAN STONE.
You now have COYOTE STONE and JAGUAR STONE, while
Titipoco has the EAGLE STONE. Look at the smashed lantern on
the left. Now walk left, to the Pyramid.
PYRAMID
Talk to Titipoco
and work through all the conversation topics with him. Look at the
scaffolding gantry. Look at the engine next to the scaffolding
gantry. Look at the generator, and take the CYLINDER from
the generator. Walk left a few steps. You’re seen by the
guard. Talk to him and choose any reply. Look at the unlit torch at
the base of the stairs.
You’re not able to
climb the stairs up to the pyramid, so you have to find another way. If
you haven’t do so already, take CYLINDER from the
generator. Use your OBSIDIAN DAGGER with the fuel line
in the generator to cut it. Use CYLINDER with the fuel
line (not the puddle of fuel) to collect some fuel, then use this with the fuel
cap in the engine on the right to fill the engine with fuel. Pick
up ROPE from the ground and talk to Titipoco about the ROPE.
You ask him to climb up the scaffolding, then throw the rope down for
you. He does so. When he returns, attach the rope to the
engine. Now press the button in the engine, and pull the lever in the
engine. The engine comes to life, raising the lift platform up to the top
of the pyramid. Talk to Titipoco again and ask him about the lever.
Step onto the lift platform, then talk to Titipoco again. He pulls the
lever on the engine, raising you up to the top of the pyramid.
TOP OF THE PYRAMID
You see George tied
up on a sarcophagus, and realise that he is about to be sacrificed. You
HAVE to save him! Look at Pablo. Look at General Grasiento.
Take AMMUNITION BELT that’s lying on the boxes behind
Pablo. Use the lift platform to travel back down to the base of the
pyramid again.
PYRAMID
Walk left a few
steps, and take the unlit torch from the base of the steps. Give it to
Titipoco. He lights the torch, and you throw it onto the fuel
puddle. Throw the AMMUNITION BELT onto the fire, and
watch the chaos ensue. You automatically head up to the top of the
pyramid again.
TOP OF THE PYRAMID
Talk to General
Grasiento, and trick him into dropping his gun. Watch the cut
scene. Look at George and untie him from the Sacrificial Table.
You, George, and Titipoco run into the Pyramid.
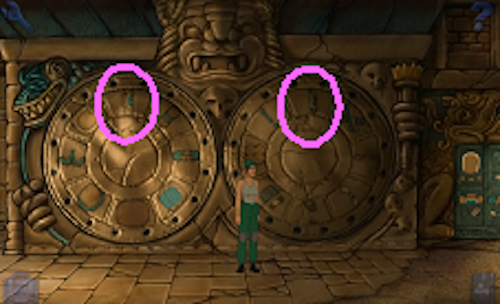
INSIDE THE PYRAMID
Look at the pattern
on the back wall, and look at the 2 levers in the pattern. Try to pull
both of the levers - they’re stuck. Talk to George and ask about the
levers. You and him pull the levers together… and fall through a trapdoor
in the floor. Watch the cut scene.
MAYAN MACHINE
You find yourself
alone in this strange room. SAVE YOUR GAME HERE. Look
at the Mayan Machine on the back wall. Walk right a few steps, and look
at the tiles with glyphs on the back wall. Look at the monkey tiles on
the right. Now this is rather tricky and tedious. You need to
recreate the 4 symbols on the monkey tiles by using the glyphs and the Mayan
Machine, in order to leave the room.
Look at the tiles
in the back wall and on the right, and number them like so.

Push Tile #2. Now
walk left a few steps, to the giant wheels. Spin both wheels, so that the
following symbols are at the top.

Walk right, and
look at the tiles in the back wall. Push Tile #5 in the back wall. Push Tile
#11 on the right.
Walk left to the
giant wheels. Spin both wheels, so that the following symbols are at the top.

Walk right to the
tiles. Press Tile #3 in the back wall. Walk left to the wheels. Spin both
wheels, so that the following symbols are at the top.
Walk right to the
tiles. Press Tile #10 in the back wall. Press Tile #12 on the right. Walk left
to the wheels. Spin both wheels, so that the following symbols are at the top.

Walk right to the
tiles. Press Tile #1 in the back wall. Walk left to the wheels. Spin both
wheels, so that the following symbols are at the top.

Walk right to the
tiles. Press Tile #8 in the back wall. Press Tile #13 on the right. Walk left
to the wheels. Spin both wheels, so that the following symbols are at the top.

Walk right to the
tiles. Press Tile #9 in the back wall. Walk left to the wheels. Spin both
wheels, so that the following symbols are at the top.

Walk right to the
tiles. Press Tile #6 in the back wall. Press Tile #14 on the
right. Voila! You’ve found the secret door! Now simply walk
through the newly revealed exit on the right.
~~~~~~~~~~~~~~~~~~~~~~~~~~~~~~~~~~~~~~
QUARAMONTE - JUNGLE (GEORGE)
~~~~~~~~~~~~~~~~~~~~~~~~~~~~~~~~~~~~~~
STATUE ROOM
You and Titipoco arrive in the Statue Room. Take the TORCH from
the sconce by the doorway, and give it to Titipoco. Ask him about the
fire. He’ll light the TORCH for you. Look at the
statue that Titipoco is sitting in. Walk left a few steps, and pull the
lever in the back wall, near Titipoco. Both of you fall through hidden
trapdoors.
LINKED ROOMS
You’re on your own now, George - you’ve no idea where Titipoco ended
up. You need to find a way out on your own. SAVE YOUR GAME
HERE. Pick up TORCH from the ground, and use it to
light the torch in the wall on the right. Pull the lever in the back wall
to seal the door. Now walk left, into the next room.
Look at the statue
in the corner. Pull the lever in the wall next to the statue, then pull
the lever in the wall on the left. Walk through the open doorway, into
the next room.
Look at the stone
head in the back wall. Pull the lower left lever, then head through the
open door, into the next room.
You’ve gone round
in a circle, and you’re back in the room you started in. Except now, the
door on the right is open. Head through the open door on the right.
You climb down some
stairs, into another room. Pull the lever at the bottom of the
stairs. The floor slides across, revealing another level below you.
Climb down the stairs.
This is it!
Watch the final cut scene, as you prevent the ancient demon from rising.
You saved the world once again, George Stobbart!
The End!
No comments:
Post a Comment